Sunday, February 14, 2010

Pickled Silkie Eggs

Pickled silkie eggs.
Oh the horror! The humanity!
The... the... the... yummy goodness!!!!

So what, you ask, is a silkie and why are the eggs different? Basically a silkie is an ancient breed of chicken that has feather issues that make them look fuzzy, in the States they are bantam sized. These are a few of our silkies. See? Fuzzy.Being as they are smaller chickens they produce smaller eggs. In the picture below you shall find eggs, clockwise from top center eggs are laid by Ezzy, Red, Joe, Bertha, Freak, Panic and Mayhem. The one in the center, the little one, was laid by Sweeny, the girl in the front in the picture above.

Now.... about those pickled eggs. Why pickle them? Why not? I have yet to have a silkie decide she needs to set eggs so I save them for a week, just in case. Every Sunday I take all the eggs from the previous week, hard boil them and pickle them. I get 3 eggs a day on average from my 5 silkie girls, giving me around 18 + a week. Sometimes more, sometimes less.
Let's start this how to with the jar. I will use nearly any glass jar that I can close air tight. In today's case it's a roasted peanut jar. This is one of the larger ones, right at a quart, will be a nice fit for 18 eggs. We shall follow the jar on this journey.

So, while those eggs are boiling, get your apple cider vinegar warmed up. I use 2 cups with 1/2 tsp pickling salt (not iodized salt please), and 1 tsp sugar, in a sauce pan over a medium low burner. I put the spices in the jar itself. 1 Tbsp onion flakes, 1 Tbsp whole pickling spice (that's this week's recipe, I vary what I use/add, no two batches are the same with the exception of the pickling spice).
Once the eggs are boiled and peeled and still warm, pack them in the jar, just don't cram them in and break them. I just drop them in as I unpeel and rinse them, no shells wanted in the jar.
Then you pour the warm vinegar mix over them and jiggle the jar to get out all the little air bubbles. Cap it tight and toss in the fridge for a week or so before eating. Yep the fridge, I'm too chicken to try leaving these out on the counter or canning them. Tastes the same I swear!
Last week's batch, I actually had 30 eggs from the silkies so I made an extra jar. They are tainted with hot sauce and tsien-tsien chillies (jar on the left).
Now that we have a taste for the pickled eggs, and trust me a jar of 18 only lasts a week, all the girls will decide to set the same day and we won't get any silkie eggs for at least a month while they hatch and raise their broods!

Friday, February 12, 2010

Making do

What do you do when it's freezing cold outside at the jobsite and you've already lost 60% of your income? You make do with what you can find instead of buying those new insulated coveralls!
Hubby is working out in the rain and mud, he gets cold easy and several layers of clothing just aren't cutting it so we had to find another option. And we did. We lucked up on a set of lined bib overalls that were at least one size too big, 6 inches too long in the legs and missing a button for one of the straps... but they were FREE!
Last night I set to work with a quick repair to at least get hubby a day or three of warmth while I wait on the zipper issues to magically resolve themselves in my head. You see, the legs are zippered all the way down. I had thought it was just a boot zipper and knew I had replacements so I could take off the extra length and replace the zipper. Nope, full leg zipper, from thigh to ankle and they are about 5 or 6 inches too long.
Anyway, the quick repair. I had to recreate some sort of fastener where the button was ripped out. Knowing this would happen again should I replace the button I decided to make a hook. I pulled out my heavy duty denim patches, which didn't match either, patched the hole left by the button, ironed it on (still fighting with Onyx for the iron I might add) and sewed over it with my machine. Good. Looked tolerable.
Nice and secure but what to make the hook out of? I remembered the large coil of bronze wire I had stashed away but it wasn't as thick as I remembered, only 12 gauge, so I had to think. We have a roll of bailing wire outside, no, decided that was a last resort. Then I remembered that bag of old wire hangers. Bingo! I hunted down the lineman's pliers, the ring pliers, and a few other of my jewelers/wire working type pliers and set to work. Once finished I tacked it on with doubled upholstery thread to get him through today, I will go back and cover with denim later this weekend to protect those threads.
Then I had to address the fact that this thing was meant for a tall person and the back was just too long and the straps were as well making the whole overall puddle around his waist. I made him hold really still while I set to work pinning up the back for a temporary fix until I had enough time to actually go in and take apart the seams and redo the sizing. I took the heavy thing to my machine and had to fight to get 3 layers of denim and lining to fit under the foot! Oh the horror! I broke 2 needles, and the machine fought back, birds nesting in all the wrong places but I got it done. It doesn't look pretty but it's functional for now.

Now to figure out the zipper issue, I'm thinking about possibly moving the brass stops on the bottom of the zippers up to where I need them and just hacking off and hemming like I normally do with his pants. Just have to figure out how to undo those brass stops.

Wednesday, February 10, 2010

Jacobean Attic Windows

So I finally got the borders added to the quilt Tuesday morning and had to fight a rather insistent cat while marking everything for quilting. Onyx was being an absolute royal pain and decided that the table where I was working was where he needed to be. Whether it was sleeping, jumping, attacking thread or fabric or just generally being his normal annoying self, the table was the point of his attention.
After finally getting it marked up, folded and tucked away in a cat proof bag I started worrying over the backing. I finally decided on that blue paisley:

So I sewed it together to make it wide enough and had to again fight with Onyx, though this time it was over the iron. The little devil knocked it off several times while I was attempting smooth out the massive wrinkles in the fabric. After ironing the whole thing 3 times without getting the worst winkles out and having a rather large knot on my heel from the monster's last attempt to kill me I gave up and prayed it would stretch out straight on the frame.
Then I pulled out my last roll of batting, it was high loft. I panicked. This is for a group of hand quilters, I was afraid it would be way too thick. But I unrolled it and fluffed in the dryer anyway. To my shock when I pulled it out it wasn't as high lofted at I envisioned so it got to go with me to quilting.
After much vacuuming, finagling, pinning, repinning, stretching, rolling, pulling and smoothing we got the quilt into the frame today. Here is a side view, I'm having to stand on top of a chair to get this much of the quilt in the shot! Top of the quilt is to the right.

Since this quit will be for my mother in return for buying me the bundle of panels, it has pink it it. I am not a fan of pink, if this quilt were for me, it would be blue or purple instead of pink!

We only work on Wednesdays from 1 to 5 so it will be a couple of months before you get to see the finished project, but for real hand quilting with those tiny stitches, it will be worth the wait!

Oh.... and I guess I ought to introduce Onyx. He was a rescue in September 2008, just a few days after we lost our beloved Topaz. When I picked him up I nearly lost what control I had on my emotions. He looked very similar to Topaz and had an attitude to match. He still has the attitude, in spades!

Monday, February 8, 2010

The Jacobean Quilt, a needle work rescue story

Back over the summer when my parents were visiting we stopped in a thrift store and found a large amount of embroidery panels, 14 of which were finished. The embroidery was excellent and the price, though high, was tolerable. So... my mother bought them, handed them over and told me to finish them. These panels were from the 70's!
They came with the instructions and color chart for a floss that is no longer made but after many, many thrift store adventures I found all but one. So I divided up the panels, half for me -all unworked- so I could ignore the color chart and half for her including the ones that had been started. I finished them, they look almost identical to the original needleworker's stitching, but they were stained unevenly. So I washed, still stained and dingy. Tea dying to the rescue and they were all even colored. I cut them down to 12.5" and started designing a quilt that would suit my mother's taste.
The panel:

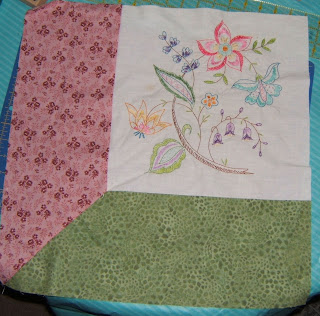
After some rifling through my stash and a forced order of fabric, since I didn't have enough of the green leaf print, these are the colors I've picked:But what to do about the block pattern? I drew out many different possibilities but none of them struck me as appropriate for this embroidery.... then I had an idea. Really large attic windows, and I mean really large! But I had to figure out which way looked best:

or

I finally settled on one and started sewing up the blocks. The one I picked:


The black and leaf green fabrics will be borders to this quilt making it a total of around 88" x 88", close to queen size. It will also be hand quilted by the Voca Quilt Club, of which I am a member. It should go in this week (Wednesday 2/10/10, geeze this is cutting it close to the wire) as my turn to put in a quilt is up! Next blog entry will show the whole finished quilt top in the frame and the backing I have yet to decide on. Probably going to be a light blue paisley but I haven't finished searching my stash yet.