Well I finished it. Finally. Had enough time off from canning to actually pick the needle back up and finish the last few stitches. I call it... Curiosity and the Kitten. I'll let the pictures speak from here on out, there are close-ups of some areas and a shot of the back.
You just never know what this stray needle will show up doing... canning, dehydrating, sewing, quilting, cooking
Showing posts with label embroidery. Show all posts
Friday, August 27, 2010
Wednesday, May 12, 2010
Jacobean Attic Windows is out of the frame!
So the majority of the hand stitching has been completed. We finished the frame portion of the work about a half hour before the end of our workday today and had enough time for a quick picture. If you click on the picture above you should be directed to a very large version of this if you would like to see the stitching pattern closer.
Now comes the fun part..... I get to go back over it and fix anything we missed or accidentally messed up. Then I get to trim it up and add the binding. That I have to think on, still haven't decided what to bind it with, maybe more of the black pattern, maybe, maybe not. And considering the large number of shedding animals in my house right now (7 cats 6 dogs) I will have to confine all work on this to my bedroom where no critters other than hatchings are allowed so it's going to take even longer.
But the hardest part is done.
Now onto the next project..... embroidered cats..... Stay tuned for pictures, I have a decent camera now ;)
Labels:
embroidery,
hand quilting,
hand stitching,
quilting
Monday, February 8, 2010
The Jacobean Quilt, a needle work rescue story
Back over the summer when my parents were visiting we stopped in a thrift store and found a large amount of embroidery panels, 14 of which were finished. The embroidery was excellent and the price, though high, was tolerable. So... my mother bought them, handed them over and told me to finish them. These panels were from the 70's!
They came with the instructions and color chart for a floss that is no longer made but after many, many thrift store adventures I found all but one. So I divided up the panels, half for me -all unworked- so I could ignore the color chart and half for her including the ones that had been started. I finished them, they look almost identical to the original needleworker's stitching, but they were stained unevenly. So I washed, still stained and dingy. Tea dying to the rescue and they were all even colored. I cut them down to 12.5" and started designing a quilt that would suit my mother's taste.
The panel:

After some rifling through my stash and a forced order of fabric, since I didn't have enough of the green leaf print, these are the colors I've picked:
But what to do about the block pattern? I drew out many different possibilities but none of them struck me as appropriate for this embroidery.... then I had an idea. Really large attic windows, and I mean really large! But I had to figure out which way looked best:
or

I finally settled on one and started sewing up the blocks. The one I picked:
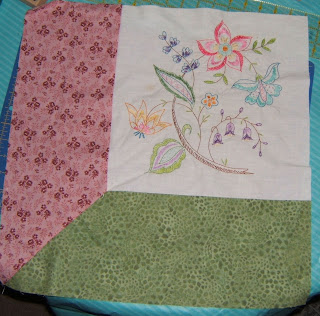
The black and leaf green fabrics will be borders to this quilt making it a total of around 88" x 88", close to queen size. It will also be hand quilted by the Voca Quilt Club, of which I am a member. It should go in this week (Wednesday 2/10/10, geeze this is cutting it close to the wire) as my turn to put in a quilt is up! Next blog entry will show the whole finished quilt top in the frame and the backing I have yet to decide on. Probably going to be a light blue paisley but I haven't finished searching my stash yet.
They came with the instructions and color chart for a floss that is no longer made but after many, many thrift store adventures I found all but one. So I divided up the panels, half for me -all unworked- so I could ignore the color chart and half for her including the ones that had been started. I finished them, they look almost identical to the original needleworker's stitching, but they were stained unevenly. So I washed, still stained and dingy. Tea dying to the rescue and they were all even colored. I cut them down to 12.5" and started designing a quilt that would suit my mother's taste.
The panel:
After some rifling through my stash and a forced order of fabric, since I didn't have enough of the green leaf print, these are the colors I've picked:
I finally settled on one and started sewing up the blocks. The one I picked:
The black and leaf green fabrics will be borders to this quilt making it a total of around 88" x 88", close to queen size. It will also be hand quilted by the Voca Quilt Club, of which I am a member. It should go in this week (Wednesday 2/10/10, geeze this is cutting it close to the wire) as my turn to put in a quilt is up! Next blog entry will show the whole finished quilt top in the frame and the backing I have yet to decide on. Probably going to be a light blue paisley but I haven't finished searching my stash yet.
Subscribe to:
Posts (Atom)